Sora 2 Prompting Guide: Mastering the Art of Video Generation
Introduction
Sora 2 represents a significant leap in AI video generation, offering unprecedented control over physics, lighting, and motion. However, unlocking its full potential requires a shift in how we think about prompting.
Think of prompting Sora 2 not as searching for a video, but as briefing a professional film crew. You are the director, and the model is your cinematographer, lighting technician, and set designer all in one. If you leave out details, they'll improvise—often beautifully, but perhaps not in the way you intended. To get exactly what you want, you need to speak the language of film.
However, leaving some details open can be just as powerful. Giving the model more creative freedom can lead to surprising variations and unexpected, beautiful interpretations. Both approaches are valid: detailed prompts give you control and consistency, while lighter prompts open space for creative outcomes. The right balance depends on your goals and the result you’re aiming for.
Most importantly, be prepared to iterate. Small changes to camera, lighting, or action can shift the outcome dramatically. Collaborate with the model: you provide direction, and the model delivers creative variations.
This guide consolidates best practices, template structures, and advanced techniques from industry experts to help you write better prompts for Sora 2.
1. The Core Philosophy: "Brief the Crew"
A strong prompt needs to answer specific questions for the AI "crew":
- The Subject: Who or what are we filming?
- The Action: What is happening? (Describe in "beats")
- The Camera: Where is the camera? How is it moving? (Lens, angle, movement)
- The Lighting & Look: What is the mood? (Color palette, light source)
- The Audio: What do we hear? (Ambience, foley, dialogue)
2. Anatomy of a Perfect Prompt
A structured prompt yields consistent results. Describe a shot as if you were sketching it onto a storyboard. State the camera framing, note depth of field, describe the action in beats, and set the lighting and palette. Anchoring your subject with a few distinctive details keeps it recognizable, while a single, plausible action makes the shot easier to follow.
Avoid walls of text; instead, organize your prompt into logical sections.
The Structure
- Format & Style: Establish the medium (e.g., "35mm film," "Digital IMAX," "Hand-painted animation").
- Subject & Setting: Concrete descriptions of the main focus and background.
- Cinematography: Camera angles, lenses, and movement.
- Lighting & Palette: Key light direction, fill, and 3-5 disparate color anchors.
- Action (The Beats): Sequential events (e.g., "0-2s: subject turns," "2-4s: smiles").
- Audio: Diegetic sounds and dialogue.
Good vs. Bad Examples
Clarity wins. Instead of vague cues like “a beautiful street,” write “wet asphalt, zebra crosswalk, neon sign reflection.” Verbs and nouns that point to visible results will always give you a clearer, more consistent output.
| Feature | Weak Prompt ❌ | Strong Prompt ✅ |
|---|---|---|
| Style | "Cinematic look" | "Wide shot, low angle. Depth of field: shallow. Lighting: warm backlight with soft rim." |
| Action | "Reviewing a document" | "Subject picks up the paper, scans the first line, then furrows their brow." |
| Lighting | "Bright room" | "Soft window light from left, warm lamp fill on right. Palette: amber, slate, cream." |
| Motion | "Moves quickly" | "Subject jogs three steps and stops abruptly at the curb." |
3. Techniques for Control
A. The "Beats" System for Motion
Movement is often the hardest part to get right, so keep it simple. Each shot should have one clear camera move and one clear subject action. Actions work best when described in beats or counts – small steps, gestures, or pauses – so they feel grounded in time.
- Beat 1: The setup (e.g., A car sits idle).
- Beat 2: The action (e.g., Engine roars, tires spin).
- Beat 3: The consequence (e.g., Car speeds out of frame).
Tip: For longer videos (8s+), plan for 1-2 distinct actions per 4-second block.
B. Visual Anchoring with Images (Image-to-Video)
For the highest level of control over the composition and style of a shot, use an image as an input. This "locks" the character design, outfit, and setting, allowing the prompt to focus purely on motion. The model uses the image as an anchor for the first frame, while your text prompt defines what happens next.
Example 1: Character Consistency
| Input image generated with OpenAI GPT Image | Generated video using Sora 2 (converted to GIF) |
|---|---|
 |  |
| Download this image | Prompt: "She turns around and smiles, then slowly walks out of the frame." |
Example 2: Animation & Remixing
You can also use this for stylized characters.
| Input image generated with OpenAI GPT Image | Generated video using Sora 2 (converted to GIF) |
|---|---|
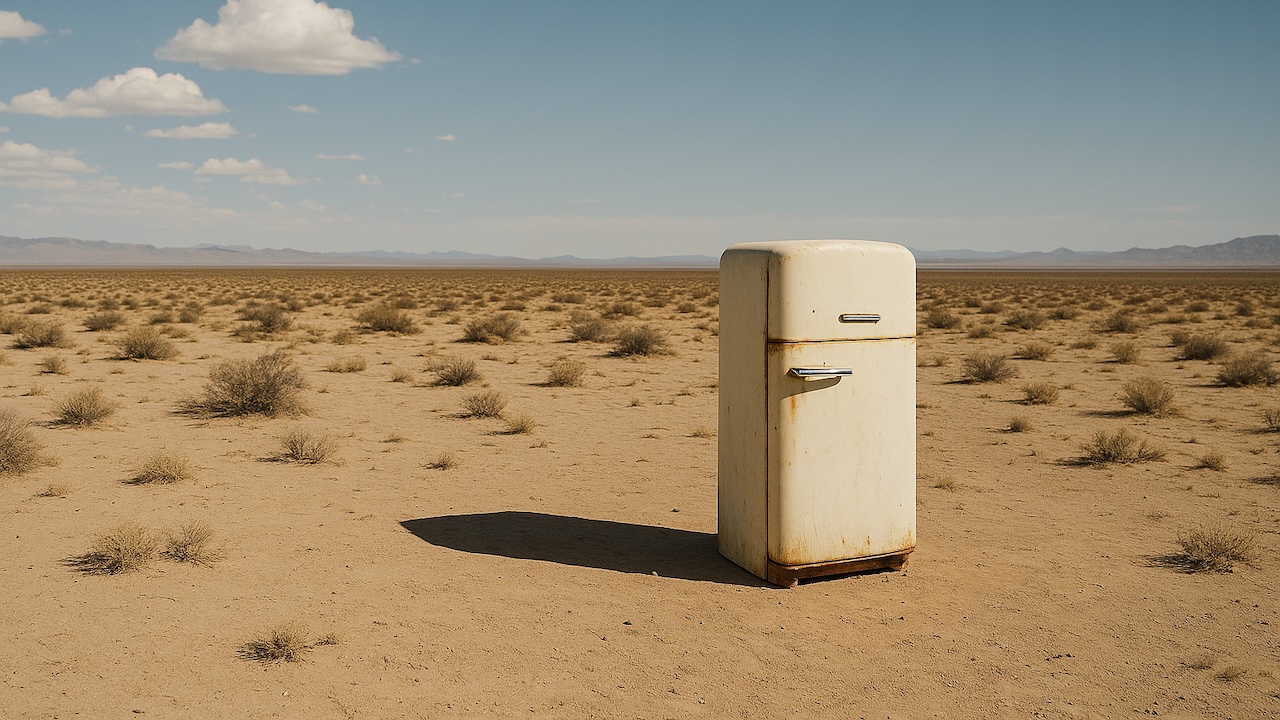 |  |
| Download this image | Prompt: "The fridge door opens. A cute, chubby purple monster comes out of it." |
C. The Power of "Remix"
Once you have a generated video, you can use the Remix functionality to tweak specific details without losing the original composition. Use it to make controlled changes – one at a time – and say what you’re changing: “same shot, switch to 85 mm,” or “same lighting, new palette: teal, sand, rust.”
| Remix Prompt | Result |
|---|---|
| Original | |
| "Change the color of the monster to orange" |  |
| "A second monster comes out right after" | 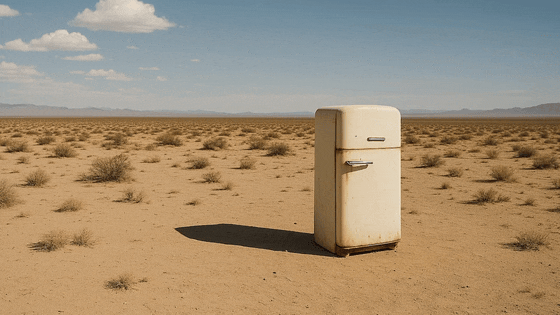 |
D. Dialogue and Audio
Dialogue must be described directly in your prompt. Place it in a Dialogue block below your prose description so the model clearly distinguishes visual description from spoken lines. Keep lines concise and natural, and try to limit exchanges to a handful of sentences so the timing can match your clip length.
- Rhythm: A 4-second shot will usually accommodate one or two short exchanges.
- Labeling: For multi-character scenes, label speakers consistently.
- Tone: If the shot is silent, you can still suggest pacing with one small sound, e.g. "distant traffic hiss" or "crisp snap".
4. Prompt Templates
Copy and paste these templates to get started.
Template 1: The Product Reveal (Commercial)
Style: High-end tech commercial, clean studio, macro photography. Scene: Graphite laptop sits on a walnut desk. Camera: Medium close, eye level, slow push-in. Lighting: Warm practical lamps with cool window edge light. Palette: amber, graphite, walnut, slate. Actions:
- Soft light sweep reveals engraved logo.
- Hand opens lid a few inches.
- Screen wakes with gentle reflection. Audio: Futuristic-sounding ambient music.
e.g. Prompt: Inside a quiet design studio at dusk, a graphite laptop sits on a walnut desk...
Template 2: The Narrative Scene (Cinematic)
Format & Look: Modern digital with soft halation; fine grain. Lenses: 35mm then 50mm; light Black Pro-Mist. Lighting & Palette: Soft window key from left, negative fill on right; anchors teal, sand, rust. Location: Entry hall of a boutique hotel; start wide, then medium. Action Sequence:
- Concierge places a room keycard inside of a paper sleeve on marble.
- The guest’s hand takes the sleeved keycard and removes it from the sleeve. Sound: Classy jazz music, low room murmur.
5. Advanced Examples
Example: The "Ultra-Detailed" Director's Brief
This prompt utilizes the full capability of Sora 2 Pro to create a specific mood.
**Format & Look:** Duration 4s; 180° shutter; digital capture emulating 65mm film contrast; fine grain.
**Lenses:** 32mm prime; slight halation on specular highlights.
**Lighting & Palette:** Highlights: clean morning sunlight (amber). Shadows: teal cast. Blacks: soft, lifted.
**Location:** Urban commuter platform, dawn. Mist in the air.
**Subject:** Mid-30s traveler, navy coat, backpack, holding phone loosely.
**Action:**

1. "Arrival Drift": Camera slides past platform signage.
2. Subject looks down tracks.
3. Train headlights flare softly through mist.
   **Sound:** Distant rail screech, low ambient hum, no music.
Example: The "Storybook" Animation
Sora 2 is not limited to realism. It excels at stylized content too.
**Style:** Hand-painted 2D/3D hybrid animation, soft brush textures, mid-2000s storybook aesthetic.
**Scene:** A cluttered workshop, shelves overflowing with gears. A small, round robot sits on a wooden bench.
**Lighting:** Warm tungsten key light, cool window spill.
**Actions:**

- Robot taps a lightbulb; sparks crackle.
- Robot flinches, drops bulb.
- Robot catches bulb in slow motion.
- Robot sighs steam (relief).
  **Dialogue:** Robot: "Almost lost it... but I got it!"
  **Audio:** Rain on window, ticking clock, mechanical whirs.
6. Troubleshooting & Optimization
-
"The video looks too chaotic."
- Solution: Reduce the number of actions. Split the scene into two separate prompts/clips. Simplify the camera movement (static cameras often yield the highest fidelity).
- Tip: Use Remix to iterate without changing the whole prompt. Change one variable (e.g., "Change lighting to sunset") and keep the rest.
-
"The subject doesn't look like my character."
- Solution: Provide an Input Image reference. This is the only reliable way to maintain character identity across shots.
-
"The motion feels unnatural."
- Solution: Describe the physics or weight. Instead of "monster jumps," try "monster heaves its heavy body upward, landing with a heavy thud that shakes the dust."
Conclusion
Sora 2 is a collaborative partner. The more precise your vision (via the prompt) and the more you understand its strengths, the better your results will be. Start with a clear mental image, use the templates above, and iterate using the Remix controls to refine your masterpiece.